Hi friends!
Sorry for the break- but that's what today's post is about.
I'm not trying to make excuses, but I've been so busy. I've been blessed recently with an abundance of life- friends, social events, work, more work, vacation opportunities, you name it, I've probably got it. I've even had the opportunity for a few dates- no, I haven't accepted them.
And the results of all this activity? Mixed, to say the least.
I have loved reconnecting socially with people- old friends, a few new. It's been simply amazing to hear their opinions, laugh at their jokes and just enjoy the company.
And the work isn't all bad either- stressful, and always a learning experience. But there's been plenty of it, to say the least.
And it all leaves me feeling... tired. Stressed.
My dad talks about "noise" a lot. Not noise like the sound of the highway out my window, or the sound of the wind or the clicking of the ceiling fan as it goes around. But mental noise- the kind that gets in your brain, keeps you from thinking. The kind that you're hearing when you enter a place, and although it might be silent, you can't truly relax there. My whole life, I've wanted my home to be peaceful- quiet, so to speak. But recently, between one thing and another, that's been difficult.
This is a common problem in my life- I fill my life up with things until I threaten to explode. Stress is still stress, even when it's good stress. But this busy-ness? This is my addiction. The need to be occupied every minute of every day, from the moment I wake up until the moment I drop from exhaustion is poisonous. Dangerous. I'm very extroverted. I love people. I need people. But I also need time to just be. That can be with another person, but right now, it usually isn't. And while that's ok, it isn't alright for me to not take the time I need to unwind simply because someone isn't there to force me to do so.
So how do I break this addiction? How do I change this cycle now, before I'm down the road 20 years and a confirmed work-aholic? All I can do is make small changes, one at a time. All I can do is say "Enough is Enough".
Enough of too many side jobs so I can't focus on my day job and I don't take care of myself
Enough of hanging out with people who don't bring me joy.
Enough of projects that are more stressful than they're worth.
Enough of letting people guilt me into doing something that I don't enjoy or simply don't want to do in that moment.
Enough of taking work "for the experience"
Enough of taking on so much I don't have time to grow as a person and professional because I'm too busy jumping every time someone asks me to.
But also:
Enough of holding onto people and things that used to bring me joy but don't anymore
Enough of sacrificing my health and well being to other people's motives.
Enough of thinking that if I do the "right" things, I'll get ahead somehow.
Enough of letting my life get so out of control that I don't have time to take care of myself and my priorities.
Enough is enough.
Until next time~
xoxox
Saturday, June 27, 2015
Saturday, June 6, 2015
Get Crafty: Nerdy Key Rack
Hi friends!
Thanks for tuning in for another post in my $5 Summer Series! I promise these won't all be craft projects, but I'm really feeling extra creative this week, so that's what we've got!
Today, I'm so so so! excited to share with you my Nerdy Key Rack! The tutorial is a little low on pictures, but I'll try to be extra clear about what I'm doing.
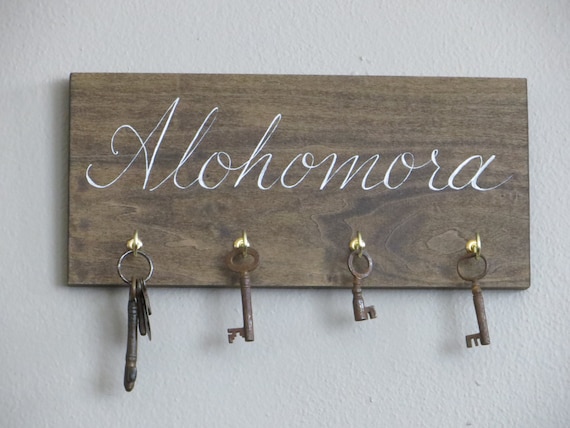
Behold:

I know. Love it. Very proud of it. Ahem.
So, I've been a Harry Potter fanatic for most of my life (the first book came out when I was about to turn 11), and I've recently decided to add some of my nerd loves to my home decor. (So keep your eyes peeled, I have plans!)
Well, I promptly fell in love with this beauty:
But, I'm a little too cheap for $35. (Sorry Etsy seller who worked very hard on this!)
So of course, I DIYed it.
I started with a piece of 1/4" ply wood that I got the guys at work to give me. It was scrap from something, and they cut it down a little bit for me. My board measures 18" L x 6"W.
I brought it home and gave it 2-3 coats with my black chalkboard paint I'm using this brand:
 I got it at JoAnns around Christmas time, and I've been very happy with it. On wood, though, you want at least two coats. I'm not planning on actually using it to chalk things very often, so two-three coats were enough.
I let it dry overnight. I hate it when tutorials say that because I am very impatient when I'm crafting, but I wanted everything dry... and it was time for bed.
The next afternoon, I came back to it!
Very lightly, with a pencil, I drew a couple of reference lines: I put a vertical line four inches from each edge (so I knew where I wanted to write!) and then a line at 2" down from the top and one at center horizontally, so I had a straight line to write on, and a straight line to mark for my hooks. Then I started at center and marked out every two inches until I was happy- I ended up with seven hooks, which is probably too many, but it looked right on my board.
Next I lightly traced out my lettering. I freehanded it, but stencils would work really well too! I did them in pencil first, and came back later to finishing them off.
Next I took some 1" cup hooks and screwed them into my board. This took a little elbow grease, but not actually very long. One caveat. If I could do it over I would use a 1/2" thick board- my screws are coming through onto the back side and I'm going to have to find a way to trim them off the back now.
Once those were screwed in tight, I gently blew away the small amount of sawdust they had churned up and used my sharpie paint marker to trace the letters over. Mine is white, but as with the paint, any color would work, really. I traced over a few times, being careful not to stop too often, as it leaves a little blip in the line.
Finally, I went back with some qtips and black paint and got rid of my pencil lines. Yes, I probably could have erased it, but I didn't want any of it to be smudgy or pink from erasers.
There! The hard work was done! It looked great! I was so pleased.... now how do I hang it up?!
Well...
I got out my picture hanging kit and dug around. I started with two nails, and then found two tiny eyebolts. I screwed them carefully into the top edge of the board, about 2 inches in from the vertical edges. (approximately over top of the out side screws). Then I took about two feet of picture wire, wrapped one end around each eyebolt and twisted several times, being sure to hide the raw end.
Then all I had to do was put a nail in the wall and find my keys!


Best part? It was cheap cheap CHEAP. My only purchase was the hooks, and they were $4.21 for FIFTY. (So... anyone need a key rack?)
The board I got from work... so... free!, and the paint and marker I had left over from some other projects. The wire and eyebolts were from a picture hanging kit I got from Lowe's after my last move. And pencils and rulers hardly count!
To recap:
Materials:
-One board. I got some scrap from work. They also sell premade plaque thingies at craft stores, or the hardwarse store will usually cut something down for you! Mine measures 18x6". You want something at least a half inch thick.
-Paint of your choice. I like my black chalk paint.
-Paint marker in contrasting color
-1 inch cup hooks. I used seven.
-2 small eyebolts
-Small amount of wire or hefty string
-ruler
-pencil
-paint brush ( I used a 1.5" foam one)
-Qtips
1. Paint your board. 2 coats is a good rule.
2. mark out some reference lines over your paint, and trace out lettering
3. screw in your cup hooks
4. Use paint marker to draw out letters
5. touch up any paint. Let dry.
6. screw eyebolts into top edge
7. string wire or string in between them
8. Hang and enjoy!
Enjoy! Let me know if you have questions in the comments! And don't forget to check out the other $5 Summer Series posts
Until next time~
xoxo
Thanks for tuning in for another post in my $5 Summer Series! I promise these won't all be craft projects, but I'm really feeling extra creative this week, so that's what we've got!
Today, I'm so so so! excited to share with you my Nerdy Key Rack! The tutorial is a little low on pictures, but I'll try to be extra clear about what I'm doing.
Behold:

I know. Love it. Very proud of it. Ahem.
So, I've been a Harry Potter fanatic for most of my life (the first book came out when I was about to turn 11), and I've recently decided to add some of my nerd loves to my home decor. (So keep your eyes peeled, I have plans!)
Well, I promptly fell in love with this beauty:
 |
| Available here |
But, I'm a little too cheap for $35. (Sorry Etsy seller who worked very hard on this!)
So of course, I DIYed it.
I started with a piece of 1/4" ply wood that I got the guys at work to give me. It was scrap from something, and they cut it down a little bit for me. My board measures 18" L x 6"W.
I brought it home and gave it 2-3 coats with my black chalkboard paint I'm using this brand:
I let it dry overnight. I hate it when tutorials say that because I am very impatient when I'm crafting, but I wanted everything dry... and it was time for bed.
The next afternoon, I came back to it!
Very lightly, with a pencil, I drew a couple of reference lines: I put a vertical line four inches from each edge (so I knew where I wanted to write!) and then a line at 2" down from the top and one at center horizontally, so I had a straight line to write on, and a straight line to mark for my hooks. Then I started at center and marked out every two inches until I was happy- I ended up with seven hooks, which is probably too many, but it looked right on my board.
Next I lightly traced out my lettering. I freehanded it, but stencils would work really well too! I did them in pencil first, and came back later to finishing them off.
Next I took some 1" cup hooks and screwed them into my board. This took a little elbow grease, but not actually very long. One caveat. If I could do it over I would use a 1/2" thick board- my screws are coming through onto the back side and I'm going to have to find a way to trim them off the back now.
Once those were screwed in tight, I gently blew away the small amount of sawdust they had churned up and used my sharpie paint marker to trace the letters over. Mine is white, but as with the paint, any color would work, really. I traced over a few times, being careful not to stop too often, as it leaves a little blip in the line.
Finally, I went back with some qtips and black paint and got rid of my pencil lines. Yes, I probably could have erased it, but I didn't want any of it to be smudgy or pink from erasers.
There! The hard work was done! It looked great! I was so pleased.... now how do I hang it up?!
Well...
I got out my picture hanging kit and dug around. I started with two nails, and then found two tiny eyebolts. I screwed them carefully into the top edge of the board, about 2 inches in from the vertical edges. (approximately over top of the out side screws). Then I took about two feet of picture wire, wrapped one end around each eyebolt and twisted several times, being sure to hide the raw end.
Then all I had to do was put a nail in the wall and find my keys!


Best part? It was cheap cheap CHEAP. My only purchase was the hooks, and they were $4.21 for FIFTY. (So... anyone need a key rack?)
The board I got from work... so... free!, and the paint and marker I had left over from some other projects. The wire and eyebolts were from a picture hanging kit I got from Lowe's after my last move. And pencils and rulers hardly count!
To recap:
Materials:
-One board. I got some scrap from work. They also sell premade plaque thingies at craft stores, or the hardwarse store will usually cut something down for you! Mine measures 18x6". You want something at least a half inch thick.
-Paint of your choice. I like my black chalk paint.
-Paint marker in contrasting color
-1 inch cup hooks. I used seven.
-2 small eyebolts
-Small amount of wire or hefty string
-ruler
-pencil
-paint brush ( I used a 1.5" foam one)
-Qtips
1. Paint your board. 2 coats is a good rule.
2. mark out some reference lines over your paint, and trace out lettering
3. screw in your cup hooks
4. Use paint marker to draw out letters
5. touch up any paint. Let dry.
6. screw eyebolts into top edge
7. string wire or string in between them
8. Hang and enjoy!
Enjoy! Let me know if you have questions in the comments! And don't forget to check out the other $5 Summer Series posts
Until next time~
xoxo
Wednesday, June 3, 2015
Get Crafty: Boho dreamcatcher wreath
It's summer time!
Summer always makes me long for flower crowns, maxi dresses and good music. I always want to bring the outside in, and hit the road.
I have a pretty wide hippie stripe and summer busts it wide open.
And, of course, I'm always full of house projects. So today I'm bringing you a crafting tutorial:
My Boho dreamcatcher wreath!
(someday, maybe I'll get into pretty photo editing on this blog. But it is not this day)
As usual, I was mega inspired by Pinterest... I mean, with pictures like these, what's not to love?

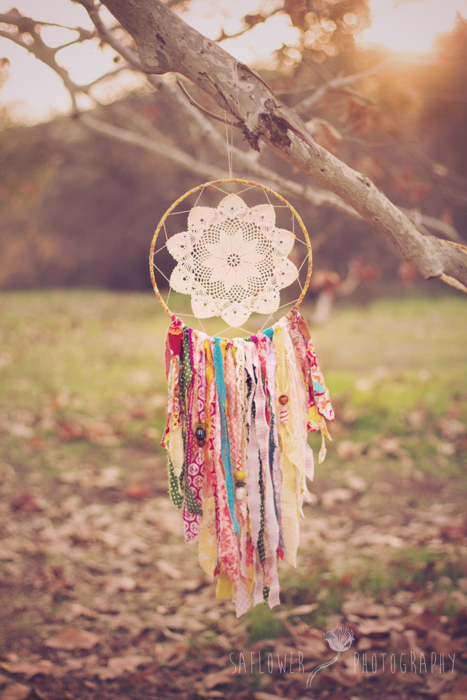
evocative of Summer, definitely.
And then, I had a thought: A dream catcher wreath for my upstairs front door!
A little more pinterest searching led me to this image:

And I was hooked. So I did some googling, and bought a 12 inch grapevine wreath at Jo-Ann's ($4.99). I pulled out some embroidery floss and some ribbon and I got crackin'.
I tried to tie the top 'web' part together... but I couldn't get the hang of it. And then I found the above video. I'll admit, the girl hosting it drove me slightly insane, but she does a great job with the tutorial! I didn't need it until about 1:30, since I was using my grapevine as the hoop part. .
After I finished the web part, I simply tied my ribbon scraps along the bottom, and then trimmed them to a length I liked. Then I simply hung it on a nail from my front door, and, well, I love it!
So, to recap:
Supplies:
12 inch grapevine wreath ($4.99)
embroidery floss in color of your choice (white is traditional, I used multi colors that I already had on hand)
ribbon scraps, beads, feathers, trims etc.
1. Watch the video and make the "web" part
2. Tie on your trims, scraps and beads
3. Trim the ends until you are pleased with them
4. Generally fidget all of the pieces. I tied a bow and added a piece of trim I'd pulled off of a top for a show I was working on
5. Hang and admire!

Thanks for reading- until next time!
xoxo
This post is a part of my Summer Series: $5 Summer fun. For more posts in this series, please start here.
Summer always makes me long for flower crowns, maxi dresses and good music. I always want to bring the outside in, and hit the road.
I have a pretty wide hippie stripe and summer busts it wide open.
And, of course, I'm always full of house projects. So today I'm bringing you a crafting tutorial:
My Boho dreamcatcher wreath!
(someday, maybe I'll get into pretty photo editing on this blog. But it is not this day)
As usual, I was mega inspired by Pinterest... I mean, with pictures like these, what's not to love?
Bright, beautiful, laid back...
And then, I had a thought: A dream catcher wreath for my upstairs front door!
A little more pinterest searching led me to this image:
And I was hooked. So I did some googling, and bought a 12 inch grapevine wreath at Jo-Ann's ($4.99). I pulled out some embroidery floss and some ribbon and I got crackin'.
After I finished the web part, I simply tied my ribbon scraps along the bottom, and then trimmed them to a length I liked. Then I simply hung it on a nail from my front door, and, well, I love it!
So, to recap:
Supplies:
12 inch grapevine wreath ($4.99)
embroidery floss in color of your choice (white is traditional, I used multi colors that I already had on hand)
ribbon scraps, beads, feathers, trims etc.
1. Watch the video and make the "web" part
2. Tie on your trims, scraps and beads
3. Trim the ends until you are pleased with them
4. Generally fidget all of the pieces. I tied a bow and added a piece of trim I'd pulled off of a top for a show I was working on
5. Hang and admire!

Thanks for reading- until next time!
xoxo
This post is a part of my Summer Series: $5 Summer fun. For more posts in this series, please start here.
Summer Series: $5 Summer Fun
Hi friends!
Summer is finally here! I may not be in school anymore, but there's something special about summer. It makes me want to try new things, take on different projects, go places, eat yummy food... (ok, I always want to do THAT!)
But you know what's a downer? Blowing the budget because of your summer plans.
So (drum roll please) presenting my Summer Series: $5 Summer Fun!
All Summer long, I'll post things that I'm doing that are costing me $5 OR LESS. Craft Projects, hikes, meals, day trips, etc.
I have a ton of ideas, but I want to hear from YOU! What are your favorite inexpensive Summer plans? If I try them out, I'll post about them!
In any case, I'll link to all of the series posts from this one, so check back often to see what I've been up to!
A couple of caveats.
Until next time~
xoxo
Summer is finally here! I may not be in school anymore, but there's something special about summer. It makes me want to try new things, take on different projects, go places, eat yummy food... (ok, I always want to do THAT!)
But you know what's a downer? Blowing the budget because of your summer plans.
So (drum roll please) presenting my Summer Series: $5 Summer Fun!
All Summer long, I'll post things that I'm doing that are costing me $5 OR LESS. Craft Projects, hikes, meals, day trips, etc.
I have a ton of ideas, but I want to hear from YOU! What are your favorite inexpensive Summer plans? If I try them out, I'll post about them!
In any case, I'll link to all of the series posts from this one, so check back often to see what I've been up to!
The $5 Summer Fun series posts:
A couple of caveats.
- cost only includes money spent specifically on that project/activity/event. Grocery staples, previously purchased craft supplies & gasoline do not count.
- Occasionally if I do something super awesome that's a little more expensive, I might post about that too.
Until next time~
xoxo
Subscribe to:
Posts (Atom)