Thanks for tuning in for another post in my $5 Summer Series! I promise these won't all be craft projects, but I'm really feeling extra creative this week, so that's what we've got!
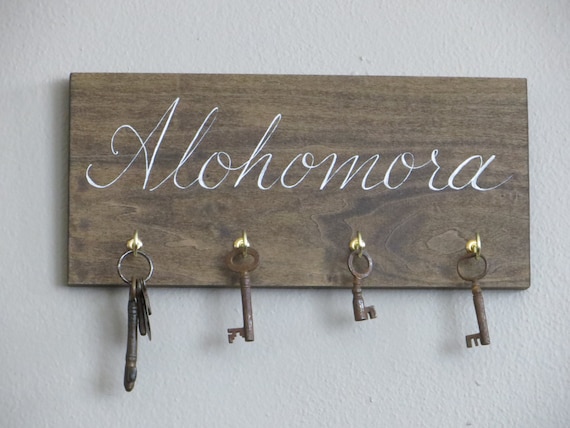
Today, I'm so so so! excited to share with you my Nerdy Key Rack! The tutorial is a little low on pictures, but I'll try to be extra clear about what I'm doing.
Behold:
I know. Love it. Very proud of it. Ahem.
So, I've been a Harry Potter fanatic for most of my life (the first book came out when I was about to turn 11), and I've recently decided to add some of my nerd loves to my home decor. (So keep your eyes peeled, I have plans!)
Well, I promptly fell in love with this beauty:
 |
| Available here |
But, I'm a little too cheap for $35. (Sorry Etsy seller who worked very hard on this!)
So of course, I DIYed it.
I started with a piece of 1/4" ply wood that I got the guys at work to give me. It was scrap from something, and they cut it down a little bit for me. My board measures 18" L x 6"W.
I brought it home and gave it 2-3 coats with my black chalkboard paint I'm using this brand:
I got it at JoAnns around Christmas time, and I've been very happy with it. On wood, though, you want at least two coats. I'm not planning on actually using it to chalk things very often, so two-three coats were enough.
I let it dry overnight. I hate it when tutorials say that because I am very impatient when I'm crafting, but I wanted everything dry... and it was time for bed.
The next afternoon, I came back to it!
Very lightly, with a pencil, I drew a couple of reference lines: I put a vertical line four inches from each edge (so I knew where I wanted to write!) and then a line at 2" down from the top and one at center horizontally, so I had a straight line to write on, and a straight line to mark for my hooks. Then I started at center and marked out every two inches until I was happy- I ended up with seven hooks, which is probably too many, but it looked right on my board.
Next I lightly traced out my lettering. I freehanded it, but stencils would work really well too! I did them in pencil first, and came back later to finishing them off.
Next I took some 1" cup hooks and screwed them into my board. This took a little elbow grease, but not actually very long. One caveat. If I could do it over I would use a 1/2" thick board- my screws are coming through onto the back side and I'm going to have to find a way to trim them off the back now.
Once those were screwed in tight, I gently blew away the small amount of sawdust they had churned up and used my sharpie paint marker to trace the letters over. Mine is white, but as with the paint, any color would work, really. I traced over a few times, being careful not to stop too often, as it leaves a little blip in the line.
Finally, I went back with some qtips and black paint and got rid of my pencil lines. Yes, I probably could have erased it, but I didn't want any of it to be smudgy or pink from erasers.
There! The hard work was done! It looked great! I was so pleased.... now how do I hang it up?!
Well...
I got out my picture hanging kit and dug around. I started with two nails, and then found two tiny eyebolts. I screwed them carefully into the top edge of the board, about 2 inches in from the vertical edges. (approximately over top of the out side screws). Then I took about two feet of picture wire, wrapped one end around each eyebolt and twisted several times, being sure to hide the raw end.
Then all I had to do was put a nail in the wall and find my keys!
Best part? It was cheap cheap CHEAP. My only purchase was the hooks, and they were $4.21 for FIFTY. (So... anyone need a key rack?)
The board I got from work... so... free!, and the paint and marker I had left over from some other projects. The wire and eyebolts were from a picture hanging kit I got from Lowe's after my last move. And pencils and rulers hardly count!
To recap:
Materials:
-One board. I got some scrap from work. They also sell premade plaque thingies at craft stores, or the hardwarse store will usually cut something down for you! Mine measures 18x6". You want something at least a half inch thick.
-Paint of your choice. I like my black chalk paint.
-Paint marker in contrasting color
-1 inch cup hooks. I used seven.
-2 small eyebolts
-Small amount of wire or hefty string
-ruler
-pencil
-paint brush ( I used a 1.5" foam one)
-Qtips
1. Paint your board. 2 coats is a good rule.
2. mark out some reference lines over your paint, and trace out lettering
3. screw in your cup hooks
4. Use paint marker to draw out letters
5. touch up any paint. Let dry.
6. screw eyebolts into top edge
7. string wire or string in between them
8. Hang and enjoy!
Enjoy! Let me know if you have questions in the comments! And don't forget to check out the other $5 Summer Series posts
Until next time~
xoxo


Love it! It would make a great housewarming gift!
ReplyDelete